Crunchy Cucumber Salad for 2

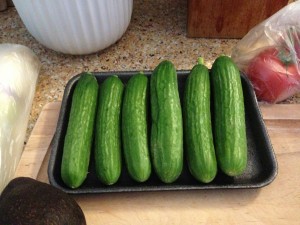
This cucumber salad is made with miniature English cucumbers. They’re not expensive and you don’t have to peel them. This makes a great little side salad, and it’s crunchy enough to hold up til tomorrow so you can have the leftovers lunch.

3 miniature cucumbers or similar amount of pickling cucumbers
1 small shallot or piece of sweet onion
1/2 medium tomato (or more to your liking)
oil and vinegar
Italian seasoning blend

  1. Prep your space:  Get out a medium cutting board, a knife, and a small bowl. If your garbage can is not nearby, have a little plastic bag open next to your work space for scraps.  Grab your steel and give your knife a quick sharpening.
  2. Wash the cucumbers since you’ll be leaving the skin on. Wash the tomato too if you haven’t already.
  3. Cut the ends of the cukes off, and then slice them at a diagonal, very thinly.  About an eighth of an inch or less.  Toss them into the bowl.
  4. Peel the shallot and cut off the hard end. If using onion obviously you can skip that part.  Slice as thinly as possible.  A very sharp knife makes all the difference here.  Scrape the pieces up with your knife and bang them in the bowl as well.
  5. Cut the tomato into smallish wedges.  Into the bowl they go.
  6. Shake some Italian seasoning onto the vegetables.  This is where you have to judge for yourself how much seasoning you like.  If you’re not sure, start with 1/4 tsp, mix it in, and look at it.  That’s about as much as I use, but you might like more or less.  It’s OK to guess, the world won’t end if you add a little too much.
  7. I use olive oil and white wine vinegar, but you could use regular oil and apple cider vinegar.  It’s a different flavor in the end, but we’re not talking gourmet here, we’re just trying to get dinner on the table.  About a tablespoon of vinegar and a teaspoon or so of oil should do it.  Mix it up, taste one, and add more if you like.
  8. Put the bowl (with spoon) into the frig to sit while you make the rest of your meal.  Maybe you could stir it once or twice if you remember.

This is my favorite summer go-to salad.  Hope you enjoy it!

Step 2:
Miniature English Cucumbers

Step 6:
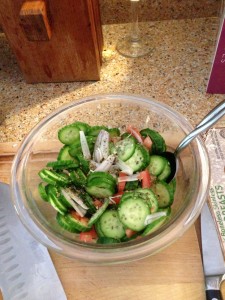
Crunchy Cucumber Salad

Yield: 2 Cups
Prep time: 10 minutes
Calories: Hardly any

Quick Kale & Cabbage Fry Recipe

Toss this easy kale recipe together as a nutritious side, while your main protein dish bakes or braises.

1 T olive oil
1/2 small cabbage
1/2 red pepper
1 medium shallot or 1/4 C sliced sweet onion
1 1-inch piece of jalapeño (optional)
2-3 sun dried tomatoes (optional)
1 medium carrot
1 bunch kale
seasonings Continue reading “Quick Kale & Cabbage Fry Recipe”

Healthy Tip: Scrubbing Carrots

I grew up thinking potatoes and carrots needed to be peeled before eating. Somewhere along the way we woke up and realized that potato peel was good for us and we started eating potatoes with the skin on.

So how many of you still peel your carrots? Did you know that peeling carrots is not only unnecessary, but it strips MOST of the nutrition from the carrot!

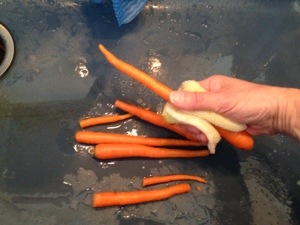
I use an old Dobie which I’ve retired from dish cleaning duty after it gets too many tears. I usually cycle through them about once a month. You could use any plastic scrubber that fits comfortably in your hand.

Wrap the wetted scrubber around the carrot and simply rub up and down a few times. Then flip it over and do the other end. 10 seconds per carrot, and voila! If you do the whole thing in the sink it goes very fast.

20130414-222738.jpg

When you’re done, leave the scrubber out to dry and then store it in a plastic baggy under your sink. I use the same scrubber for potatoes, carrots, and parsnips.

Scrubbing carrots is so easy, you’ll never go back to peeling. Making a beef stew the other day I had to clean a pound of carrots. They were pretty thin carrots, and peeling them would have taken me about 10-15 minutes and also would have left me a mess of peels to clean up. Scrubbing them took about 2 minutes and left zero mess.

Yummy Rummy Pineapple Smoothie Drink

I whipped this up during a break from cleaning the garage on a Saturday afternoon. I didn’t use the garnish at the time, but I think it’s a nice touch don’t you?

1/3 fresh pineapple, skinned & including core, cut into large cubes (500 g)
1-1/2 cups ice cubes (300 g)
3/4 cup rum
Agave to taste

Garnish:
Extra pineapple chunks without core (optional)
Mint leaves (optional)

1. Blend pineapple and ice cubes in a Vitamix or heavy duty bar blender. If using Vitamix blend on high for one minute.

2. Add rum and approximately 3 tablespoons agave nectar. Blend on medium for about 15 seconds.

3. Taste for sweetness. Add more agave if needed and reblend for a few seconds. Pour into small drink cups. I prefer plastic highball glasses for use on the deck.

4. Optional. Put two or three pineapple chunks on a toothpick and place on top of each glass. Add a small mint leaf for a nice final touch.

Salud!

Gluten Free Pumpkin Muffins

Whodathought you could make GF muffins that don’t taste GF?

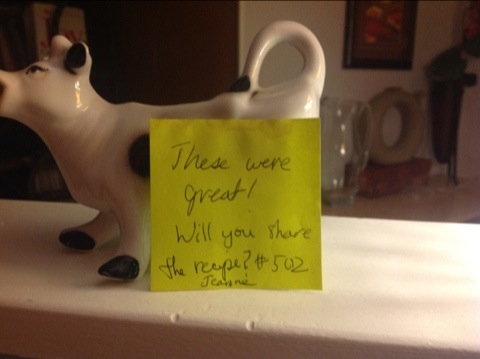
I made these with freshly puréed roasted pumpkin that I made from a leftover Halloween pumpkin (uncarved!). I brought some to work and left them in the break room, and found this note stuck to the empty plate.

20121205-211017.jpg
P.S. I made these in a toaster oven with a convection option.

Lisa’s Gluten-Free Pumpkin Muffins

Wet Ingredients:
1/4 C Butter
3/4 C Sugar
2 eggs
1 tsp vanilla
2 C fresh pureed pumpkin (drained)

Dry Ingredients:
2/3 C brown rice flour
2/3 C gluten-free oat flour
1/3 C almond flour
1/3 C tapioca starch
1-1/2 t xanthan gum
1 T baking powder
1 t baking soda
1/2 t salt
1-1/2 t pumpkin pie spice

Directions:
1. In a large mixing bowl, cream butter and sugar until fluffy. Add eggs, mixing after each one. Add vanilla and pumpkin and blend well.

2. In a separate bowl, mix all dry ingredients together well.

3. Gradually add dry ingredients to wet pumpkin mixture. Use mixer on low to mix until just blended. Do not over-mix.

4. Preheat oven to 350.

5. Wipe muffin tin cups with a light coat of oil. A non-stick 12-muffin pan is ideal.

6. The dough will be heavy and dense. Use a large table spoon to scoop dough into cups. It should mound slightly above the surface of the tin.

7. Bake for 18-20 minutes.

Let cool slightly in the tin and then use a butter knife to gently pry each muffin out. Cool completely on wire rack.

An Easy Way to Pit Olives

I was making Moroccan Chicken in my new cast iron dutch oven tonight when I was faced with removing the pits from about 30 green olives.

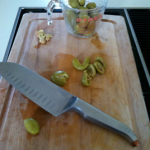
Pitting Olives the Easy Way
Place the flat blade of your knife over an olive.

I had meant to buy pitted ones but I was in a hurry at the store and just grabbed the whole non-pitted ones without thinking.

So I did a little research and found this neat trick for pitting olives. It does make a bit of a mess of the olive, but when you’re just adding them to a stew, who cares?

[Note: Apparently olives with pits are moister than their pitted relatives and impart much better flavor to your food.]

Take an olive and place it on your cutting board. Take a large knife, and with the side of the blade press down on the olive until you feel it “give.”

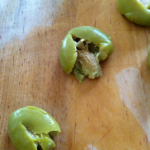
Pitting Olives, Remove the pit
The pit practically pops right out of the olive.
Lift up your knife to reveal a flattened olive that’s been burst open on one end. Pick it up and pull the pit out with your fingers.

[Another Note: Look for the little stem that sometimes is still sticking to the end of the olive, and remove it. In my 1-1/2 cups of olives I found three with the stems, so just keep an eye out.]