Roasted Turkey Thighs & Potatoes with Broccoli

Serves 2-4
Prep time: 15 minutes
Total time: 1 hr 30 minutes

This weeknight meal is so effortless, it practically makes itself! If you use very large thighs you will have leftover meat to use in another meal later in the week.

Ingredients

  • 1 package of (2) turkey thighs
  • 1-2 Tbsp steak or other rub-type seasoning blend
  • 2 baking potatoes (white or sweet)
  • 1 bunch of broccoli (or replace with green beans or zucchini or salad or whatever greens you like)
  • olive oil
  • Salt & pepper or other desired seasoning
  • Potato fixings: Butter, chives, sour cream or plain greek yogurt

Directions

  1. Preheat your oven to 375F on convection, or 400F on regular.
  2. Scrub the potatoes under running water, and wrap them in squares of tinfoil.  Puncture with a sharp knife in several places. Set aside.
  3. Remove turkey thighs from package and cut away any excess fat or loose bone materials.
  4. Put the thighs skin-side up on a cutting mat or kitchen towel. Sprinkle with the seasoning mix and lightly rub the seasoning into the turkey.
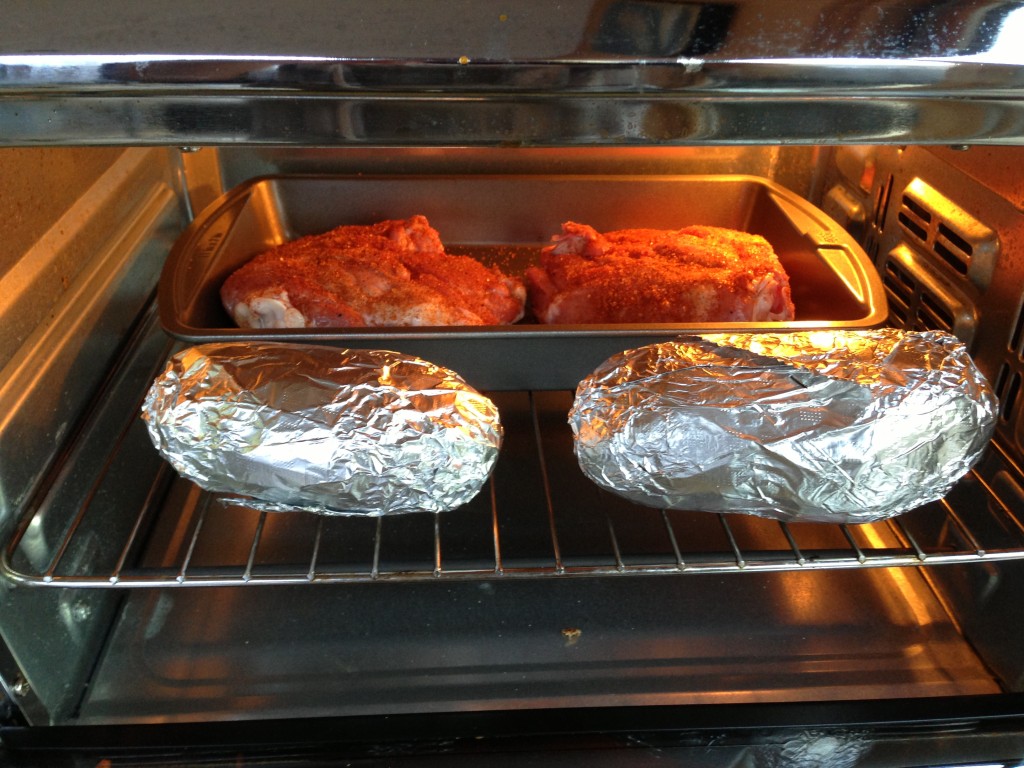
  5. Dribble some olive oil onto a small roasting pan. Place the thighs skin side down in the pan and sprinkle the exposed side with the seasoning. Lightly rub the seasoning in with your fingers.
  6. Place the pan in the oven, along with the potatoes and set a timer for 30 minutes.
  7. After 30 minutes, turn the thighs over (skin side up now) and rotate the potatoes.  Set the timer for another 30 minutes.
  8. Prep your broccoli (or other green vegetable) by trimming off the hard ends and little leaves, and cutting into mouth-sized pieces.  Put into a sauce pan with a quarter inch or so of water in it (or use a steamer), and cover.
  9. When the turkey and potatoes are done remove them from the oven and set aside.
    Put a clean towel over the turkey (not foil).
  10. Cook the broccoli about 6 minutes or until crunchy tender.
  11. Serve all! Put some butter, plain greek yogurt (or sour cream), and salt and pepper on the table for dressing the potatoes.

Photos

Step 5 – Put turkey in pan.
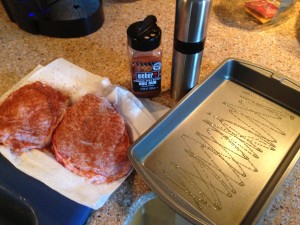
Raw turkey thighs with rub

Step 6 – Put turkey and potatoes in oven.
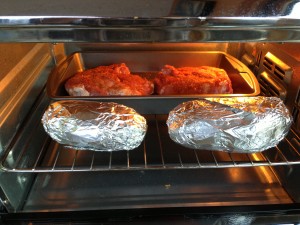
Turkey and Potatoes in the Oven

Nutrition Info

Oops, not here yet. Coming soon!

Quick Kale & Cabbage Fry Recipe

Toss this easy kale recipe together as a nutritious side, while your main protein dish bakes or braises.

1 T olive oil
1/2 small cabbage
1/2 red pepper
1 medium shallot or 1/4 C sliced sweet onion
1 1-inch piece of jalapeño (optional)
2-3 sun dried tomatoes (optional)
1 medium carrot
1 bunch kale
seasonings Continue reading “Quick Kale & Cabbage Fry Recipe”

Gluten Free Pumpkin Muffins

Whodathought you could make GF muffins that don’t taste GF?

I made these with freshly puréed roasted pumpkin that I made from a leftover Halloween pumpkin (uncarved!). I brought some to work and left them in the break room, and found this note stuck to the empty plate.

20121205-211017.jpg
P.S. I made these in a toaster oven with a convection option.

Lisa’s Gluten-Free Pumpkin Muffins

Wet Ingredients:
1/4 C Butter
3/4 C Sugar
2 eggs
1 tsp vanilla
2 C fresh pureed pumpkin (drained)

Dry Ingredients:
2/3 C brown rice flour
2/3 C gluten-free oat flour
1/3 C almond flour
1/3 C tapioca starch
1-1/2 t xanthan gum
1 T baking powder
1 t baking soda
1/2 t salt
1-1/2 t pumpkin pie spice

Directions:
1. In a large mixing bowl, cream butter and sugar until fluffy. Add eggs, mixing after each one. Add vanilla and pumpkin and blend well.

2. In a separate bowl, mix all dry ingredients together well.

3. Gradually add dry ingredients to wet pumpkin mixture. Use mixer on low to mix until just blended. Do not over-mix.

4. Preheat oven to 350.

5. Wipe muffin tin cups with a light coat of oil. A non-stick 12-muffin pan is ideal.

6. The dough will be heavy and dense. Use a large table spoon to scoop dough into cups. It should mound slightly above the surface of the tin.

7. Bake for 18-20 minutes.

Let cool slightly in the tin and then use a butter knife to gently pry each muffin out. Cool completely on wire rack.

Venison (Deer) Stew Recipe

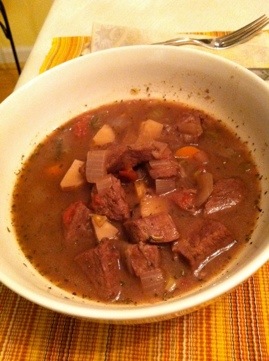
My husband’s friend at work is a frequent hunter so we were recently the beneficiaries of a three pound bag of this delicious lean meat. Last week we finally took it out of the freezer and let it thaw in the frig for several days. Today we have a huge pot of venison stew.

This big pot of stew cost us all of about $6 in vegetables and miscellaneous ingredients, since the meat itself was free!

20121209-200719.jpg

If you find yourself with a hunk of venison from a hunter-friend and you’re not sure what to do with it, give this a try, I really think you’ll be surprised at how wonderful this basic stew is. The meat is definitely the star of the show!

Ingredients:

3 lbs venison meat
olive oil
all purpose flour
2 large onions
4 stalks celery (plus some leaves if there are any)
2 large carrots
2 medium parsnips
4 cloves garlic
2 jalapeno peppers
1 can organic diced tomatoes
1 C red wine
5 C beef stock
3 bay leaves
1 Tbsp Herbs de Provence
salt and pepper

Tools:

Large non-stick pot
plastic spatula
large plastic spoon
large santoku-style knife
small paring knife
several small to medium sized bowls
re-purposed scrubber
peeler
wood cutting board

Directions:

  1. First cut up all vegetables and place into bowls. Different vegetables cook differently so I find it helpful to put certain vegetables together: onions and celery, carrots and parsnips, garlic and jalapenos. Then I’ll add the vegetable “groupings” to the pot at the same time.
  2. Cut up the meat into stew sized pieces, cutting against the grain. Place meat in a large zipper bag.
    Add 1/3 C flour, salt and pepper (to taste) to the bag. Seal the bag making sure there’s plenty of air in the bag and shake up the meat to coat it.
  3. Put about 2 Tbsp oil in the pot and turn to medium heat.
  4. Dump half the meat from the zipper bag into the hot oil and brown meat on all sides. This takes about 4-5 minutes. [Don’t worry about doing this perfectly, just toss the meat around every half minute or so and you’ll get most of it browned.] Remove the meat to a large bowl and do the same thing with the other half. Add a little more oil to the pot if needed, about a teaspoon at a time. Remove the second batch to the bowl as well.
  5. Add a tiny bit more oil if you need to, and add the onions and celery to the pot. Saute these briefly until they start to soften.
  6. Add the carrots and parsnips and continue to saute until the vegetables start to brown.
  7. Finally add the garlic and jalapeno and saute for another minute or so.
  8. Add the red wine to the pot and scrape the bottom of the pan with a wooden spatula to release whatever yummy stuff has stuck to the bottom of the pan. Let that simmer for a minute.
  9. Add the meat, tomato, stock, and seasonings to the pot and bring to a boil.
  10. Reduce heat to a low simmer, cover, and let cook for an hour. Check it occasionally to make sure the simmer is low and that you aren’t losing liquid. You can add more stock to the pot if you like. Just don’t add stock or water within the last 20 minutes or the flavors won’t all have time to blend.

Serve with crusty whole grain bread, preferably home made!
[Note: Most seasoned makers of venison stew claim that slow cooking is the best method. Deer meat is lean but it is not super-tender in general. I would have to agree that if this stew was made in the slow cooker it probably would be a lot more tender. I have’t tried it yet since hunting season is over, but if you do try that please let us know how it turns out! If you’re wondering how, just put everything in your slow cooker at step 9 and cook it on low for 6-8 hours.]

Nutrition Information:

Servings: 6
Calories: 461
Protein: 55 g
Fat: 11 g
Carbohydrates: 24 g
Fiber: 4 g
Sugar: 8 g
Sodium: 646 mg

An Easy Way to Pit Olives

I was making Moroccan Chicken in my new cast iron dutch oven tonight when I was faced with removing the pits from about 30 green olives.

Pitting Olives the Easy Way
Place the flat blade of your knife over an olive.

I had meant to buy pitted ones but I was in a hurry at the store and just grabbed the whole non-pitted ones without thinking.

So I did a little research and found this neat trick for pitting olives. It does make a bit of a mess of the olive, but when you’re just adding them to a stew, who cares?

[Note: Apparently olives with pits are moister than their pitted relatives and impart much better flavor to your food.]

Take an olive and place it on your cutting board. Take a large knife, and with the side of the blade press down on the olive until you feel it “give.”

Pitting Olives, Remove the pit
The pit practically pops right out of the olive.
Lift up your knife to reveal a flattened olive that’s been burst open on one end. Pick it up and pull the pit out with your fingers.

[Another Note: Look for the little stem that sometimes is still sticking to the end of the olive, and remove it. In my 1-1/2 cups of olives I found three with the stems, so just keep an eye out.]

How to Prepare and Cook Kale

I’m sure a lot of people have never tried kale because they don’t know how to cook kale. I was one of those people too until just a few years ago. That was when I discovered that kale is a great tasting, highly nutritious leafy green vegetable, similar to spinach.

Kale is best when fresh, so cook it within a few days after you buy it at the grocery store. Make sure it’s a nice dark green with firm leaves and no brown spots or flimsy areas.

Kale is also very inexpensive, especially when you buy it in season. I can get a huge bunch of it in season (January-March) for about $1.29.

[Time saving tip: Make the whole bunch at once, even if you won’t eat it all that night. Store the rest in the frig for a few days. Then you can briefly microwave it and serve with another meal. That’ll save you a lot of time.] Continue reading “How to Prepare and Cook Kale”